The journal function of ISUComm Courses offers instructors an effective way to evaluate students’ written work outside of quizzes and tests. This also provides students with a space to collaborate in groups, a reading journal they can revisit throughout the semester, or a means to participate in class activities electronically.
Step 1
Click “Turn editing on” at the top of the course site.
![]()
Step 2
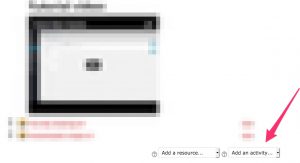
Choose the block in your course where you want to add the new resource. Select “Add an activity or resource” at the bottom of that block:
Step 3
Step 4
Once you create a title and prompt for your journal activity, you can then customize other activity settings.
Days available: This option lets you select how long the activity remains open to students. You can also select “Always Open.”
Grade & Grade Category: If you want the journal graded, “Grade” lets you select a value or point total for the journal’s worth, and “Grade category” lets you put the journal in a certain grade book category.
Group & Grouping: “Group mode” lets you control how students interact with each other through the journal activity. Students can either see everyone’s work in the class with no group assignments, only their own group members’ work, or other groups’ work as well. “Grouping” lets you assign a journal activity to a particular cluster of groups.
Note: Selecting “Available for group members only” makes the activity only visible to students within a particular grouping.
Visible: This is a global setting that controls a journal’s visibility on the course homepage; it doesn’t matter the grouping or group a student belongs to.
Step 5 (Optional)
Now that you’ve created a journal activity, you may want to give your students feedback or a grade. From the course homepage, if you select your journal activity, you’ll be able to see how many entries have been submitted.
After selecting to view the journal entries, you can enter a grade through a drop-down menu and enter feedback for those students who’ve submitted a response. Once you’ve finished entering in grades or feedback, scroll to the bottom of the page and click “Save all my feedback.”
For Support
If you encounter difficulty during any part of these tasks, please e-mail us at olt@iastate.edu for assistance, or stop by 306 Ross during our scheduled support hours.
If you cannot see the images in this documentation, click here.