Welcome! In this tutorial, you will learn how to set up a scheduler in ISUComm Courses. Scheduler allows you to schedule appointments or individual conference with your students. To create your own schedule, follow the instructions below.
Step 1. Add the scheduler module to your course page
Step 3. Set up specific dates, times for events
Step 1: Add the scheduler module to your course page
First,
Click “Turn editing on” at the top of the course site.
![]()
Next,
Click on “Add an activity” or resource in the desired block on the course page.
![]()
Then,
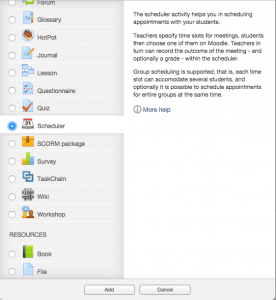
Choose “Scheduler”, and click on “Add”

Step 2: Basic settings
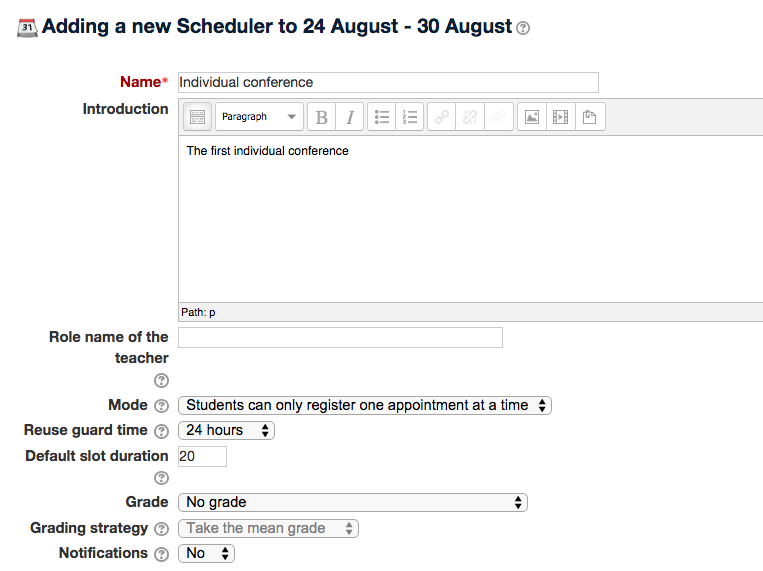
4. After adding a scheduler to your course page, you will see the following page for the basic set up.

1) Name: Type a name for the event in the “Name” input field.
2) Introduction: Write a short description about the event in the “Introduction” field.
3) Role name of the teacher: Type in your role as Instructor.
4) Mode:
- For a one-time event (e.g. individual conference after an assignment), select “Students can register 1 appointment in this scheduler.” This is probably what most teachers want to use if you are doing one-time conferences for
- For a recurring event, select “Students can register 1 appointment(s) at a time.” This option allows students to re-register after you have marked them off as having attended an appointment.
5) Reuse guard time: set as default (24 hours)
6) Default slot duration: set the duration of a single slot (e.g. 15 minutes, or 20 minutes)
7) Grade & Grading strategy: Choose a grading option if you want to grate this activity.
8) Notification: Set “Yes” if you want you and your students to receive emails when the students apply for, change, or cancel an appointment.
Click on “Save Changes” for the basic set up.
It will take you to the following page.
Step 3: Set up specific dates, times for events
There are two ways to add appointment slots: 1) Add slots and 2) Add single slot. 
Step 3-1. Add Slots
5. To add multiple appointment slots, click on “Add slots”.
1) Date & Repeat Time Slot: If you want set up multiple appointments during specific periods, you can set up the periods in Date and Repeat Time Slot Until section.
(e.g. the appointments will begin on November 10 and end on November 14, 2014.)
2) Add appointments on: You can also set up the days for the appointment.
(e.g. The appointments will be held on Monday, Wednesday, and Friday).
3) Start time & End time: You can set up Start and End time.
4) Divide into slots: Set ‘Yes’ as default
5) Duration: You can set up the duration of each appointment (e.g. the appointment will be held for 20 minutes per student)
6) Break between slots: You can set up break between each slot (e.g. there is a 5 minute break between each slot)
7) Force when overlap: Set No as default
8) Allow multiple students per slot: It allows multiple students to choose the same slot. For individual conference, you may want one student to sign up for a single slot. (e.g. I allow one student to sign up for the appointment)
9) Reuse this slot: Set Yes as default. You can allow several students to sign up for one slot. If a student or you revoke an appointment, the freed slot can be re-used
10) Location: Add the place for the appointment
11) Teacher: You name will be displayed as default
12) Display appointment to students from: It allows students to view their appointments
13) Email a reminder: A reminder email is sent to your students.
Click on [Save Changes] to set the slots.
Step 3-2. Add single slots
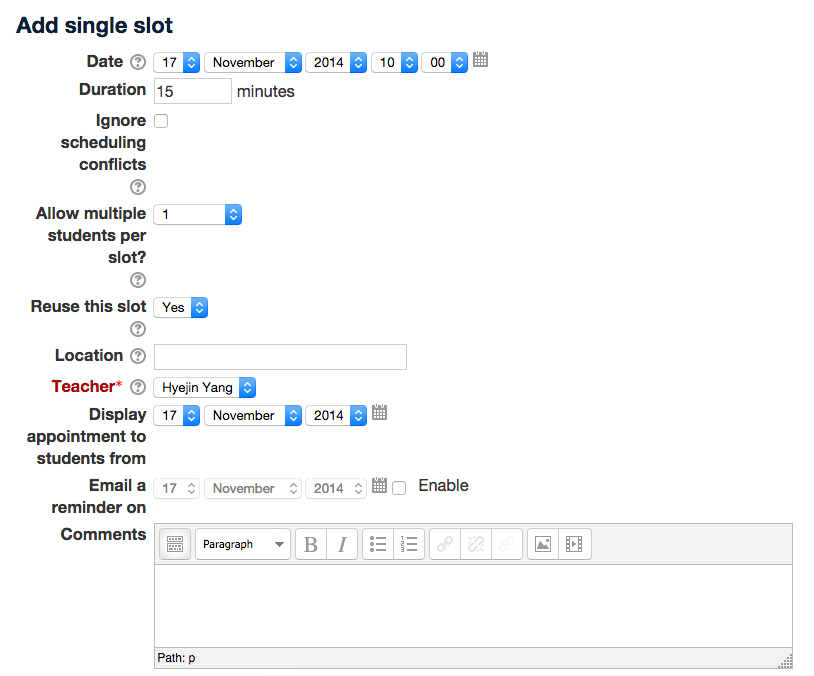
6. To add a single appointment slot, click on “Add single slots”.
1) You can set up “Date”, “Time”, “Duration”, “Location”, “Email reminder” the same as you do for Add Slots. (Read Step 3-1 for the further instruction).
2) You can set up a single appointment with a single student. You can select a certain student for the appointment in this module. (e.g. You can set up an appointment with a student (Kate) regarding recommendation letters).
Click on Save Changes
3) You can see the specific information for the appointment with your student in the following page. 
If you need further options for scheduler, please click this link.
For Support
If you encounter difficulty during any part of these tasks, please e-mail us at olt@iastate.edu for assistance, or stop by 306 Ross during our scheduled support hours.
If you cannot see the images in this documentation, click here.


