Welcome! In this tutorial, you will learn how to find personal information about your students within your Moodle course page. This tutorial assumes that your students have already successfully enrolled in your Moodle course. For instructions on enrolling students, check out this article about enrollment keys.
Note: AccessPlus is generally the easier method for obtaining student information. Check out this article at ISUComm Sites for accessing student Net-IDs through AccessPlus. However, experience has demonstrated that student information is occasionally missing from AccessPlus for one reason or another. If your students’ information is ever missing from AccessPlus, chances are good that you will be able to find it on your Moodle course page instead, as detailed below.
Step 1. View the “Enrolled Users” page
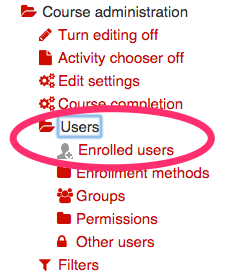
To see all currently enrolled users in your course, select the “Users” folder under “Course administration” within the “Administration” block on the side of your course page. Then, click on “Enrolled users.”
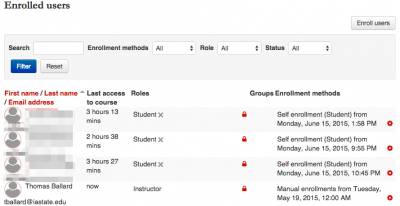
The Enrolled Users page will look like this (minus the blurred names). Notice that you will be listed as an instructor as well and that there is a search bar to look for individual students’ names. If you just need one student’s Net-ID or email address, you can easily find it here. If you need multiple students’ Net-IDs, see step 2. If you want to view a student profile, see step 3.
Step 2. Collect your students’ Net-IDs
3) To collect all of your students’ Net-IDs, which you may want to do for sending a request for ISUComm Sites or for setting up a mass email to your students, highlight all of the user names on this page, including the text in the enrollment methods column. Using Cmd + A (Mac) or Ctrl + A (PC) may seem like a time saver for this step, but a Select All will actually make the next part more complicated, so don’t do that.
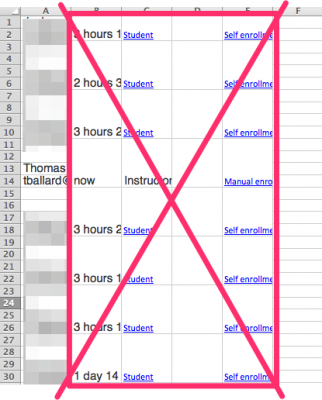
Once all of the information is highlighted, copy and paste the content into an Excel spreadsheet or other worksheet of your choosing (these instructions use Excel). The content comes in a bit scrambled, but is quite easily fixed. Simply select columns B through E and delete those columns.
Now, resize the remaining column A so that you can see the students’ names and Net-IDs. As a final step you may want to delete the extra spaces between names, your own name, and possibly students’ names if you just wanted Net-IDs.
Step 3. View a student’s profile
If you want to view a student’s profile, you can do so by clicking on the user icon in the “Enrolled Users” page.
Some students update their profiles to include pictures of themselves and other personal information, and you may choose to make creating a profile an assignment for your students to get to know each other. See this article about creating a profile to get started.
For Support
If you experience trouble with any of these steps, you can contact support at moodle@iastate.edu.
If you cannot see the images in this documentation, click here.


