Welcome! In this tutorial, you will learn how to assign roles in an ISUComm course.
There are two main types of roles in an ISUComm course: a role of a student and a role of a teacher. When you have your new ISUComm course site created, the site administrator assigns you the role of teacher. At the same time, when your students use the enrollment key that you have provided to them to enroll in your course, they are automatically assigned the roles of students.
However, there might be a situation when you, as an instructor, need 1) to manually enroll a student in a course, or 2) add another instructor to the same course to share resources or collaborate on creating course materials or 3) remove users or suspend them.
Step 1. Assign roles to users who are not enrolled yet
Step 2. Assign a different role to users who are already enrolled.
Step 1. Assign roles to users who are not enrolled yet.
1-1. To assign a role, click on “Enrolled users” under “Users” category in the Administration block.
1-2. On the right corner of the table, click on “Enroll users”.
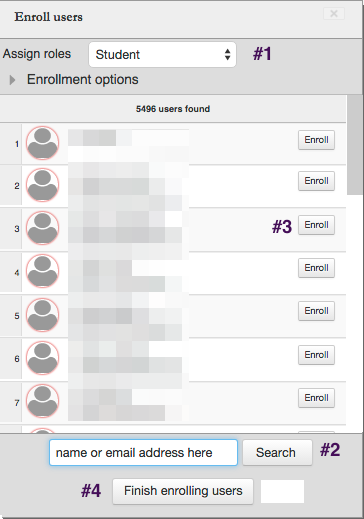
1-3. (1) Choose which role you want to assign (that is a student or a teacher)
(2) . In the search box, type in the name or email address of the person you want to add and click “Search.”
(3) click on ‘Enroll’ to add the student to your course.
(4) Click ‘Finish enrolling users’
(Please note that the person you want to add must have an ISUComm Courses account on the ISUComm Courses site. If this person is not registered on the ISUComm Courses site, he or she must first create an account before you can assign a role to this person.)
1-4. Click “Finish enrolling users” at the bottom of the pop-up window.
Step 2. Assign a different role to users who are already enrolled.
2-1. To assign a role, click on “Enrolled users” under “Users” category in the Administration block.
2-2. Click on a gear button to add a different role to a user.
2-3. A new pop-up window for assigning roles will appear. Select the role you wish to assign.
Students or other teachers will have an access to your course as soon as you assign them a role. They will NOT need to use an enrollment key to access your course.
Step 3. Remove users.
To remove or delete a user, select a user in the “existing users” column, and click “X” as shown in the image below. However, don’t be too quick to remove or delete a user from your course. Once you delete a student, though, that student’s data will be lost forever. In the past there have been instances of instructors removing/deleting students from Moodle courses only to later need the student data for various administrative purposes. It might be more prudent to suspend a student from your course, that way you will be able to retrieve the data in the future if necessary.
For Support
If you encounter difficulty during any part of these tasks, please e-mail us at moodle@iastate.edu for assistance, or stop by 306 Ross during our scheduled support hours.
If you cannot see the images in this documentation, click here.


